Saturday, August 25, 2012

Door Hardware

So here is a tutorial of how we (Mike) installed our new door hardware. In my original door post, I talked about how I had spray painted (my fast growing hobby) our existing brass handles. While it turned out okay, it wasn't spectacular by any means. So Mike and I decided that we should spring for new door handles because why buy beautiful new, white doors just to put cheap, hand-me-down door handles on it? It's like a burlap sack on a beauty queen!

Anyways, below is a step-by-step of how we (Mike) installed them. Before I begin, I should preface that we bought a template from Menards.

#1: Tape area where door handle will go. We did this to keep the paint from chipping and the wood from splitting due to the pressure of this process.

#2: Line up the template with door jam on the door frame.


#3: Insert circular template onto drill. The template is the "white thing" for lack of a better description. This is the part that makes the circle opening. It fits into the template that is installd on the door. You have to drill on one side until it cannot go any further. Then start drilling with the same template on the other side; it should pop out after doing this on both sides of the door.


#4: Drill the latch hole. This is another drill template similar to the handle template. Just switch out the template on your drill and line it up with the door template. (I love the intense look on Mike's face - I had to post the picture!) This is the part where Mike's drill created a lot of smoke - yup, kind of like a the start of a fire.


#5: Create the latch ridges with the template. Mike used a hammer to create the ridges for the latch. After creating the outline, Mike wedged out with a hammer and some muscle.


#6: Remove the tape. Now that all the drilling is done, you can remove the tape. This is when I started to feel a sense of relief that the door was still intact.


It's also when my self-diagnosed OCD kicked in because of all the saw-dust (!!!)


#7: Drill the door jam onto the door frame.


#8: Insert the latch mechanism (yup that's my technical term) into the door. It's a simple insert now that the hole is created. All Mike had to do was drill in the screws.


#9: Line up the door handles and screw into place. Essentially it's finesse for this step; no skill. You literally wiggle the handles until the line up. After that, they should work together (as a normal door handle should). Once this happens, screw the handles into place.


#10: ENJOY NEW DOOR HANDLE!


Have I mentioned how lucky I am that I'm married to a man that has the initiative and skill to figure all these things out?! Also, have I mentioned how much easier it is to open doors with handles? Sticking my fingers underneath and pulling it open from the bottom is not very conducive to my hurried life. Husband & handles = awesome!

Friday, August 24, 2012

Bathroom Upgade

So I seem to wander through Target a lot. I just can't help it - all the colors, different fabrics, and I always walk out completely in love and feeling like I got a deal. It's pretty much my second marriage. Anyways, Mike has been begging for a new shower head for our master bathroom. BECAUSE early in the morning when he's showering (while I'm sleeping) the shower makes an awful screeching noise. Apparently it means we should try getting a new shower head (I basically believe all of Mike's knowledge).

While wandering Target this week, I found a shower head. Not just any shower head - a WATERFALL shower head. Mike's dream apparently. So I bought it like the great wife I am. Except for too bad, so sad - the shower head doesn't work with our shower caddy that hangs over the shower neck. So we're upgrading the bathroom downstairs a little earlier than planned (and much to Mike's chagrin).


Here is the Before and After. Upgrade, right? (And yes, eventually through this blog I'll learn to take pictures from the same angle - alas, I tried) It was a pretty simple process - I just assume all plumbing projects are difficult. Not this one! Simple 1-2-3!

#1: Unscrew the old shower head.


#2: Make sure nothing is left behind in the shower neck!
(We had some sort of filter?)


#3: Screw on new shower head!
(Mike had to use a pliers to tighten it appropriately. No leaks allowed!)


And WAH-LA! A brand-spanking new shower head. It's practically like a natural waterfall.


Monday, August 20, 2012

I told you...

I love spray paint. I think it may be a little obsessive how many things I think "I could spray paint that!" about. I did a post before about random projects I did around the house with spray paint. So here's another! Outside we have these awful exterior lights by the front door and garage.


Pretty awful, huh? I'm not sure what's worse - that it's brass, or that it's RUSTING brass. Oh, and I forgot to take an up close picture of the light by the door (if you're wondering why there are "missing numbers" in the picture on the right). Eventually, I'll accurately document for this blog. Anyways, I used 2 types of spray paint because I had random spray paint (because of my spray paint obsession) left over.


Ideally, I would have had an entire can of the Sem-Gloss Rust-Oleum paint. That gives it a better shine, instead of the other paint (on the left) that was more of a flat finish. But because I was running out of the semi-gloss spray paint, I did my first coat to coverage with the one on the left and the second (and final coat) with the one on the right


I just put down tarp outside because we had it laying around from all our paint jobs. In hindsight, I wish I hadn't taken it all apart. I could have just taken off the top and taken out the glass. Putting it together was VERY difficult. It was NOT like a fun puzzle. But even though it was a more difficult project than I realized it, it was worth it!


Oh yeah, I also chose not to attach that tail part because I thought it was a little too much for me. It'll do for the time being. Now onto the other 2 fixtures by the garage ....Yay?

Saturday, August 18, 2012

We have bedding!

I posted a week or so ago about how Mike and I just got a new (KING-SIZED!) bed. Well because of that I only had sheets for the bed. As a comforter ...welllllllll... we had two fleece blankets. That counts, right? I know - not really. But now we have REAL bedding:


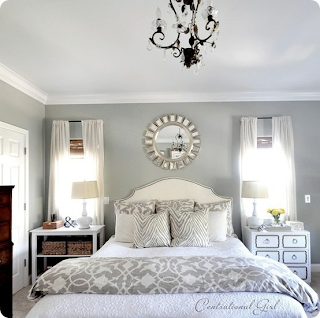
I've been searching high and low for bedding. I loved Centsational Girl's blog about her bedroom makeover - it's been my inspiration! So I'm very excited to have found this similar pattern (especially since I didn't want a duvet).


My search was really an adventure. I went to Kirkland's, Bed Bath and Beyond, Steinmart, World Market, and I'm sure I'm missing more but just can't remember because it' a blur. By the end of the day I was tired and pretty done with my search. So I went to Target for relief (I just love Target), and behold, I found bedding! The shade of gray helps to make the walls look grayer (they tend to look blue sometimes). Next up for us is making a headboard out of one of the doors we're getting rid of. Of course, there will be a post for that!

Thursday, August 16, 2012

Doors Doors Doors

I think I've mentioned this before, but if I haven't ...Mike and I have been living without doors. For a solid couple weeks now. We took them down when we moved in so we could properly paint the door frames white (*sigh* I love my hand-painted white trim). And since we had hollow doors that were pretty cheap looking, we decided to spend the money and upgrade to get half solid-core doors (for the bathrooms and bedrooms - less noise FYI) and half hollow doors. So we finally got them last week but I've been dragging my heels with the more painting project. NOTHING is worse than painting something that is already white, white again. No sense of accomplishment is what I think.

By aren't they pretty?! And, yes, I'm aware the door is upside down in the picture but I can't lift them and Mike doesn't stop his handy work for my photo shoots.


Before we could start painting, Mike had to cut the grooves (yup, that's my technical term) for the hinges. So he bought a template and measured where the old door hinges were placed to model the new doors after them (you can see the old door underneath the new one on the table so he could get better alignment).


 After Mike finished this process on all the doors, it was time for painting. We are using the same paint on the doors that we did the cabinets and trim. It's Benjamin Moore's Cloud Cover White in their Regal line of paint. We're also using the same foam rollers because it covers so evenly.


In addition to this project, I'm working on spray painting (I LOVE SPRAY PAINT, especially when it's metallic) all the hardware until we're able to upgrade.


So many doors! But we're ticking off our homeowner projects one by one! WOO HOO!

Sunday, August 12, 2012

Deck Success!!

Yay for successful days! We paused the door project (I've almost gotten used to living without interior doors) and took advantage of the overcast day to work on staining the deck. We used Wolman's DuraStain. Originally we bought semi-transparent, but quickly realized we weren't getting the coverage we wanted. So we went back and exchanged it for a solid stain. We ended up needing about 2 and 1/2 gallons for our deck plus the railing.

To begin the project, Mike taped off around the house to make sure we didn't get any unwanted marks on the sides of the house. (NOTE: Mike also power washed the deck with a basic stain remover and also sanded down the really tough spot spots. He also prepped by making sure all the nails were secure.)


We then painted the railing first in case we got any drips onto the floorboards. This was particularly difficult for us because of how close the bushes are planted to the railing. Let's pause for these hilarious pictures:


Great - now that we've got that out of the way I can continue. For painting the railings, we bought 3" deck staining brushes, and Mike bought a 6" brush for the deck itself.


So here's the big reveal - our OFFICIAL Before&After's:


Woohoo!! Now all we need is deck furniture (as Mike yells "A GRILL!" in the background)!