Showing posts with label Kitchen. Show all posts

Saturday, February 8, 2014

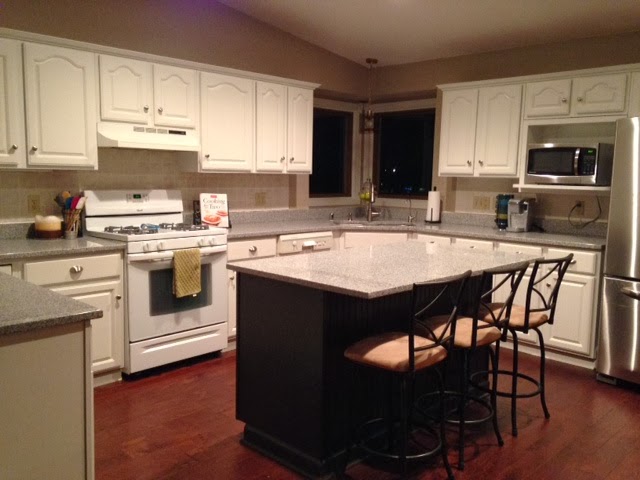
Granite. Enough said.

Completely behind but completely worth the wait (just nod yes, please). I could tell you all about how amazing it is in comparison to what we moved into and what we've lived with, but pictures always speak so much louder (and better) than words.


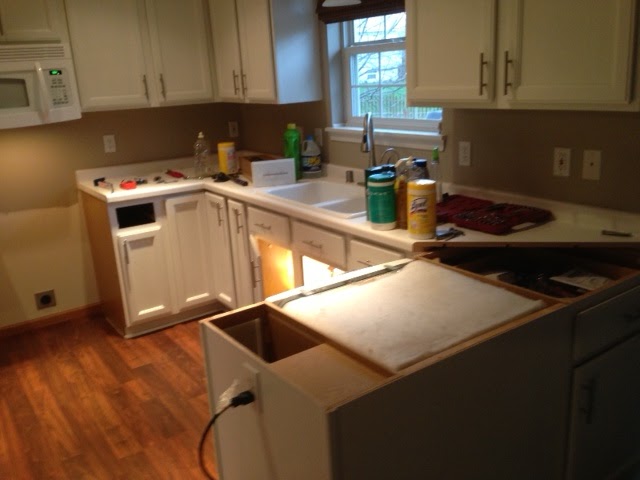
Before
 
Painted the cabinets white (tutorial from our last house!)
 
Constructing the kitchen island
 
Constructed island with temporary wooden top
(and new Mike-installed wood floors!!)
 
AND NOW...........


Complete with a new sink and faucet ...so shiny.
 
Well we're in love. Hope you are too! It's exponentially more awesome to bump into the kitchen island and not almost push the counter top off (Yup, we never attached the wooden door all this time. We figured it would motivate us to save up for our granite). Well, on to our next project right?

Friday, September 20, 2013

Island Time - Part 2

After building the island, it needed a little lipstick to make it pretty. So I followed the same steps we did for painting our bathroom cabinets in our last house

Deglossed

Primed

Painted (ended up being 3 coats)
 
I'll post pictures soon with our new flooring! I'm in love!

Island Time!

Unfortunately the title of this post isn't referring to a getaway vacation (I wish). I'm talking about building a kitchen island. Ever since moving into the house we knew this big 'ole kitchen was begging for an island. See the space below from when we moved in


Before being able to lay down the flooring, we knew we needed to get to work on the island. While a custom-made island would have been wonderful, it just didn't fit into the budget. After walking about Menard's and Home Depot's island/cabinet areas, we wandered into the free-standing cabinet island. Bingo! We found two sets of cabinets that we could pair together. It was the perfect width (at a minimum the spacing between cabinet and island counter tops should be 3') and beautifully in our price range. So we brought them home...


To secure them to the floor, Mike drilled 2x4 planks into the ground. We, then, set the island over top of them because the shelves create a natural gap at the bottom. See below, Mike drilling the island into the already secured 2x4's
 
 
Because we used a basic set of cabinets (which we secured together), we had to put some sort of back on the cabinets to give it a finished look. We chose wainscoting for the back, which we bought in planks similar to this. To secure the wainscoting, we used wood glue. Because the planks fit together with a tongue-and-groove system, we put glue in the grooves to make it more secure.
 
 
Note: We taped the boards together and let the glue bond for 24 hours. After this, we used the same glue to secure the wainscoting (now) board to the cabinets. Mike went a little crazy with the glue the next day...


Again, we let the glue bond for 24 hours and taped it for extra security.


To add the finishing touches, we bought base and corner material. Mike used the miter saw to cut the pieces to the correct lengths and angles


Next up - more painting! (P.S. You may be wondering about the counter top. It's actually an old door that was doubling as a workbench tabletop in our basement. It was left behind by the old owners, so we're putting it to good use until we can afford new counter tops. I'm still brainstorming finishing ideas in the meantime!)

Sunday, August 4, 2013

Flooring Update - Part 2

This weekend we went to town on removing the old carpet in the great room and vinyl flooring in the kitchen. We Mike first started in the kitchen. He pulled up the flooring in pieces by simply (probably not simple to him) cutting and pulling it up.


Then he had to go over the floor with a scrapper to get al the extra glue and paper off the floor.
 
 
Then to our dismay, we also realize the vinyl had been glued onto underlayment. We had to remove this because otherwise the great room and kitchen wouldn't have been level. At first we were worried that the underlayment was glued down. Luckily (as lucky as this could have been), it was stapled down. So Mike was able to chip away the underlayment.


However, this left a sea of staples. Fast forward a couple hours, we sat and hammered them all into the existing subfloor. Thank God I have the most amazing dad who helped us out.


Before that though, we had to remove the carpet and tile that surrounded the front door. The carpet was a quick and easy removal. We cut and rolled it up into pieces. What we thought would be the harder part was the tile in front of the door.
 
 
But all it called for was a little elbow grease. And, again, some great dads! First, Mike use a screwdriver and hammer to pry up the tile.
 
 
To our surprise, the tile popped off easily.
 
 
The next part in the process was to remove the platform that the tile was applied to (it made it level with the old carpet). Mike had to use the drill to unscrew it from the subflooring.
 
 
Then Mike wedged the platform up. And this is wear the elbow grease comes in....


We're so excited to have gotten it done in one day. We only had one injury too! I'm telling you - I leave for an hour and Mike injures himself. He had to go get stiches on his finger because he destroyed it during the demo. Don't worry - he's fine now.
 
Anyways, the end result doesn't look all that pretty now, but it will! We're hoping to install the new flooring sometime this week.


Oh, and it got a little dusty during the demo...


Flooring Update - Part 1

Moving into this house we knew that we wanted to rip up the flooring and put down a seamless wood floor. The space is just calling for it right?
 
 
So we bought a lot of floor. A LOT of flooring. 1100 square feet to be exact. It's currently sitting in our four seasons getting acclimated to our house temperature (most flooring needs to sit in it's new home for at least 48 hours).
 
 
The first part of our demolition process was the kitchen. It was suppose to be a simple removal because it was laminate wood that snapped together. Then we found two more layers of cheap vinyl flooring.
 

The laminate wood only took us a half hour to pull up. The boards were so flexible they literally pealed off the floor.

 
We decided that the vinyl underneath would be a more difficult task so this is where we called it a day. Because it was a weeknight. And I wanted to eat dinner.


So this weekend we really went to town! I'll post about that tomorrow!

Kitchen Cabinets Complete

Our cabinet doors are hung up and the hardware is installed! WooHoo! Here's a brief tutorial on how we installed our hardware. This was a little bit different than the first time because in our last house it was a blank slate. The previous owners had now existing hardware so we were able to drill holes wherever we pleased.

However, in this house, the cabinets already had holes drilled where the previous hardware had been. So instead of using wood putty and sanding down each hole, we chose to work with the existing holes for the knobs on the doors. However, for our drawers, we chose pulls that could cover up the existing holes. See below! (Please excuse the hideous countertops)


First, we Mike measured the width between the holes


Then we assumed (maybe that's too trusting - but I also think Mike measured) that the existing hole was correctly centered. So Mike divided the width of the previous measurement and marked the distance. Using a piece of tape helps with marking these measurements. It also keeps the wood from splitting when drilling the new holes.

 
It's literally that simple. Mike drilled holes at those markings and the screws tightened from inside the drawer. So simple and so lovely!
 
 
Oh, and in case you're wondering how we remembered which doors went where, I made a diagram where all the doors were numbered. It's not the prettiest looking thing but it definitely helped. We just taped a number on each door and, while painting, we put the number on the table so we could match them back.
 

Sunday, May 19, 2013

Kitchen Upgrade!

This is completely overdue but at least I'm catching up now. Ever since we moved in, Mike and I knew we wanted to update the kitchen with granite counter tops. Just to remind you, this is what our kitchen currently (as of a month ago) looks like:


I love the white as you all know, but I also LOVE contrast. And since these current counter tops are HORRIBLE, we decided an upgrade was in order. I say they're horrible because they're such cheap laminate that little bits of dirt (or spilled sauce) gets into it, making it look grungy. Yuck!

So onto the upgrade! The night before Mike started tearing out the old counter tops (to save on the money to remove and also because I think he likes demolition). Don't mind that we didn't paint behind the stove - it was too difficult in our defense!!


Then the REAL professionals started to install...


And here's the final picture!


And here's my favorite part of posts - Before (like when we moved in) and After!


Sunday, November 25, 2012

Continuing the light theme

After hanging the pendant light in the kitchen, we also took on hanging up a different light fixture above the table. The one that came with house wasn't our style and didn't go with the updates in the kitchen. See....

To start - Mike got his hands on a light fixture that wasn't being used. So of course we put it to good use! Here's what it took to get it hanging:

1. Take down the current light fixture plate and pull the wires out of the hole. To pull the wires out of the hole (as in picture #3) I had to hold the light fixture while Mike pulled out the wires.


#2: Detach the light fixture wires from the ceiling wires. To do this, you take off the red caps. This is the where the wires twist together. Untwist the wires so it looks like the picture below (and don't lose the red caps!) Also make sure you're taking note of what wires connect with what.

 
#3: On the new light fixture, thread the tube along with the bracket and nuts through the wire. It should look like the picture below - but I'm sure for every light fixture there's a variance so read the directions!
 

#4: While one person holds the light fixture, the other needs to thread the wires through the bracket still on the ceiling. This was how our old light fixture was attached so we didn't install that ceiling bracket. You can see in the picture that the wires go up into the hole and back down.
 
 
#5: Connect the light fixture wires to the ceiling wires. Just as you detached the wires to begin with, you need to attach them again. Simply twist the corresponding wires to each other. This is where remembering the correct pairing of wires comes in handy. After you twist them together, put the red cap over the attachment.
 
 
#6: Push the wires back into the ceiling. It should look like the picture below (Make sure your wire connections are secure).
 

#7: Secure the light fixture plate to the ceiling. Ours secured with a screw, but again, I'm sure it depends on the light fixture.

#8: Enjoy!