Monday, May 26, 2014

The final countdown ...of tile!

And the tiling continues around the tub to the shower walls and to the shower floors. I was the (delirious-because-it-was-way-past-my-bedtime) cement applier...
 
And Mike was the placer.
 
It a labor of love. Look as all those tiles and spacers and literally hours of my life hanging on those walls! You can see we added the decorative base to the tub enclosure we built earlier.
 
After the tub, Mike started on tiling inside the shower. That was a pain! So many angles. And you can see he put in blocks of wood to hold the first row of tiles as they set.


So here's how I'll leave you today - so close! We're almost there in this never-ending bathroom remodel! This is also the point where I tell you Mike had to have surgery on his shoulder so we called in a professional to finish the job. Clearly, Mike (nor I) thought my talents could finish this project off. Next post - FINISHED BATHROOM!!

Rub-a-dub-dub! Let's build a tub!

Before we could continue with the tiling, we had to address the tub. What to do? What to do? So after a lot of hunting around the web I decided I really loved the wood surround on some of the tubs I saw. So that's what we set out to do. Here are the steps to building a wood tub enclosure:

 
 #1: Measure and cut plywood to fit around the base of your tub.

#2: Apply wood glue (see below for the brand we used) to secure the plywood to the base.


#3: To prevent gapping (like below), use a nail gun around the perimeter of the board. We tried to place our nails where we knew the decorative base would cover it up.

 
Side note: We also build a small bench in the awkward space between the shower and the tub. We included this as part of the "tub surround" so it would look like it was also meant to be there.

 
ANOTHER NOTE: See that piece of paper inside the bench. We tossed in a quick note from us to any future home owners. I love the idea of passing love along in a house!

So we sealed it in...
 
#4: After gluing and nailing the wood to the base, paint as desired. I used the same color paint as the cabinets to tie it all together.

Don't worry that it looks ridiculously flat. We wanted to create a "built-in" look so we primed and painted these cabinet doors (that match the existing cabinets) and secure them to the tub surround. Pictures to come! With tile!


We may be crazy

Way overdue. Apologies. But I honestly think Mike and I may be clinically crazy for some of the projects we take on. It's been a little too hectic to keep up but it's calming down (just in time for it to rev up again though, right?!)

So we started our bathroom demolition like I said. So here are the pictures of our Mike's demo:

Out came the shower doors
Out came the tile and drywall around the shower
Out came the shower base! It's getting real, people.
The demo continues around the tub. Can you tell demo is Mike's favorite part?

So then the bathroom was a Hot Mess. All the places where Mike had taken off the tile (around the tub, in the shower, on the floor), we had to put up Durock (cement board). So in the picture below you can see Mike started putting up the Durock in the shower area.
And then around the tub

He also installed Durock underlayment on the floor to be the base for the tile.
 
You can see after screwing it down, Mike taped and sealed the boards with mortar.
 
Take note the half walls enclosing the shower area. They did not exist in the bathroom before but we knew we couldn't afford floor to ceiling glass enclosures for the shower. Solution? Half walls = half the glass. So Mike went to building the walls with 2x4's, patience and a lot of calculating.
 
 
After he built the walls, he was able to start the waterproofing kit. I'm sure there are technical websites on why's and how's so we followed the directions and I suggest you do the same! To me, it looks like paper, but it's special paper!. You basically wrap it around anything and everything (so all our shower walls and flooring) that we want to be waterproof, adhering it with mortar.


And this is how I leave you, with our bathroom being a Hot Mess. Next up - tiling!

Saturday, March 8, 2014

It's all in the details!

I thought I'd share some of the small details that I've updated around the house that make it feel more like our home! It's the details that really make a house for me (For Mike, it may be the demolition...)


#1: White Trim - we (finally) painted the trim white in all the bedrooms, making it feel more crisp and clean. It makes any space newer


#2: Wall art - I started collecting pieces of wall art in our last house. To Mike's despair, I just can't have enough. They're all so different and all so beautiful. Here's a couple shots of the wall art from our house. I'm a firm believer that art (as for everything else in your house) should mean something to you.
(In our bedroom)

(Letting my inner artist out!)
 
(I have a thing for maps. And what you can't see are the tiny icons that represent each state)
 
(Art can take the place of a headboard)
 
#3: Trinkets - I have no better for them, but I love trinkets. The little things around your house that don't necessarily have a function besides being awesomely cute/cool/pretty/funky. The adjective for your space and find a trinket!


We were able to snag this buffet table from Mike's grandparents (who are so ridiculously generous) for our entryway. I already had the plant from Marshall's that I bought for our last house. Same with the candle sticks but I bought blue candles for a pop of color. The long bowl and wicker-like balls are also from Marshall's (a trinket-lovers paradise). I'm in love with the simplicity.

#4: Lighting - the lighting you choose for your house also makes a huge difference. We're currently on a hunt to replace the light above our kitchen sink, but in the mean time I can share the new lighting we have in the four seasons room. We replaced this ugly old fan with a new, crisp fan. Makes a world of a difference!


Hope you enjoyed looking at the little details around my house. I seem to add more and more everyday. It may be an addiction. Up next on our plate is our master bathroom demolition (Mike's favorite), so stay tuned!

Saturday, February 8, 2014

Granite. Enough said.

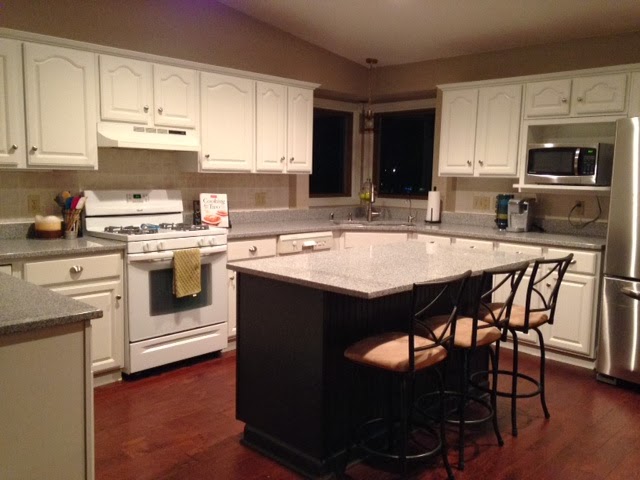
Completely behind but completely worth the wait (just nod yes, please). I could tell you all about how amazing it is in comparison to what we moved into and what we've lived with, but pictures always speak so much louder (and better) than words.


Before
 
Painted the cabinets white (tutorial from our last house!)
 
Constructing the kitchen island
 
Constructed island with temporary wooden top
(and new Mike-installed wood floors!!)
 
AND NOW...........


Complete with a new sink and faucet ...so shiny.
 
Well we're in love. Hope you are too! It's exponentially more awesome to bump into the kitchen island and not almost push the counter top off (Yup, we never attached the wooden door all this time. We figured it would motivate us to save up for our granite). Well, on to our next project right?